User guide
Everything you need to install Level Insight, run a check, and get useful answers out of the result. The add-in only reads your model. It never changes it.
Install
- Close Revit.
- Run LevelInsight-Setup. It installs for your Windows user only and does not ask for administrator rights.
- Tick the Revit versions you want (the setup lists 2023 to 2027) and press Install.
- Start Revit and open a project. The Level Insight button is in the Add-Ins tab.

To update, close Revit and run the newer setup again. It replaces the old files. To remove the add-in, use Apps in Windows Settings, or run the setup with /uninstall.
Windows may show a SmartScreen warning when you start the setup, because the installer is not code-signed yet. Choose More info, then Run anyway, if you trust the source.
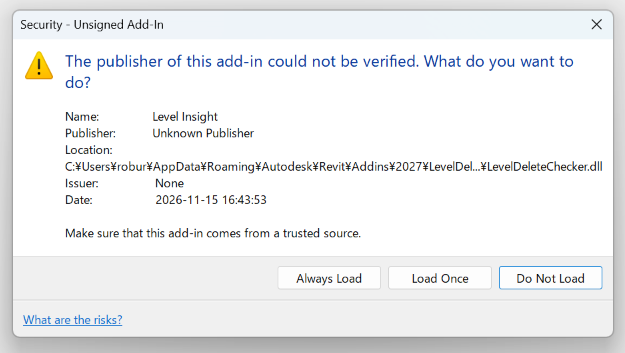
The first time Revit starts with the add-in, it shows a security dialog, "Unsigned Add-In", because the add-in is not code-signed yet. This is expected. Choose Always Load so it does not ask again. The add-in only reads your model; it never changes it.
Level Insight works on Windows with Revit 2023, 2024, 2025, 2026 and 2027. The interface is available in English and Japanese. Choose the language in the list at the top right of the window. It is remembered the next time you open Level Insight.
Trial and license
The first time you press the button, a 7-day trial starts. During the trial you can check and view everything, but selecting elements in Revit, copying IDs and exporting are locked until you add a license key. A license window appears once each time you start Revit and press the button. It shows how many trial days are left. Press Continue trial to go on, or Buy a license to open the purchase page.
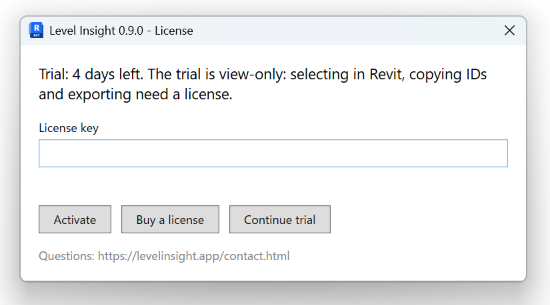
To activate, paste the license key you received by email into the License key field and press Activate. The key is checked on your computer, so no internet connection is needed. When the trial has ended, the window appears every time and the check runs only with a valid key.
Uninstalling keeps your license and trial information on the PC, so reinstalling does not restart the trial.
Run a check
- Open the project in Revit. Any view works.
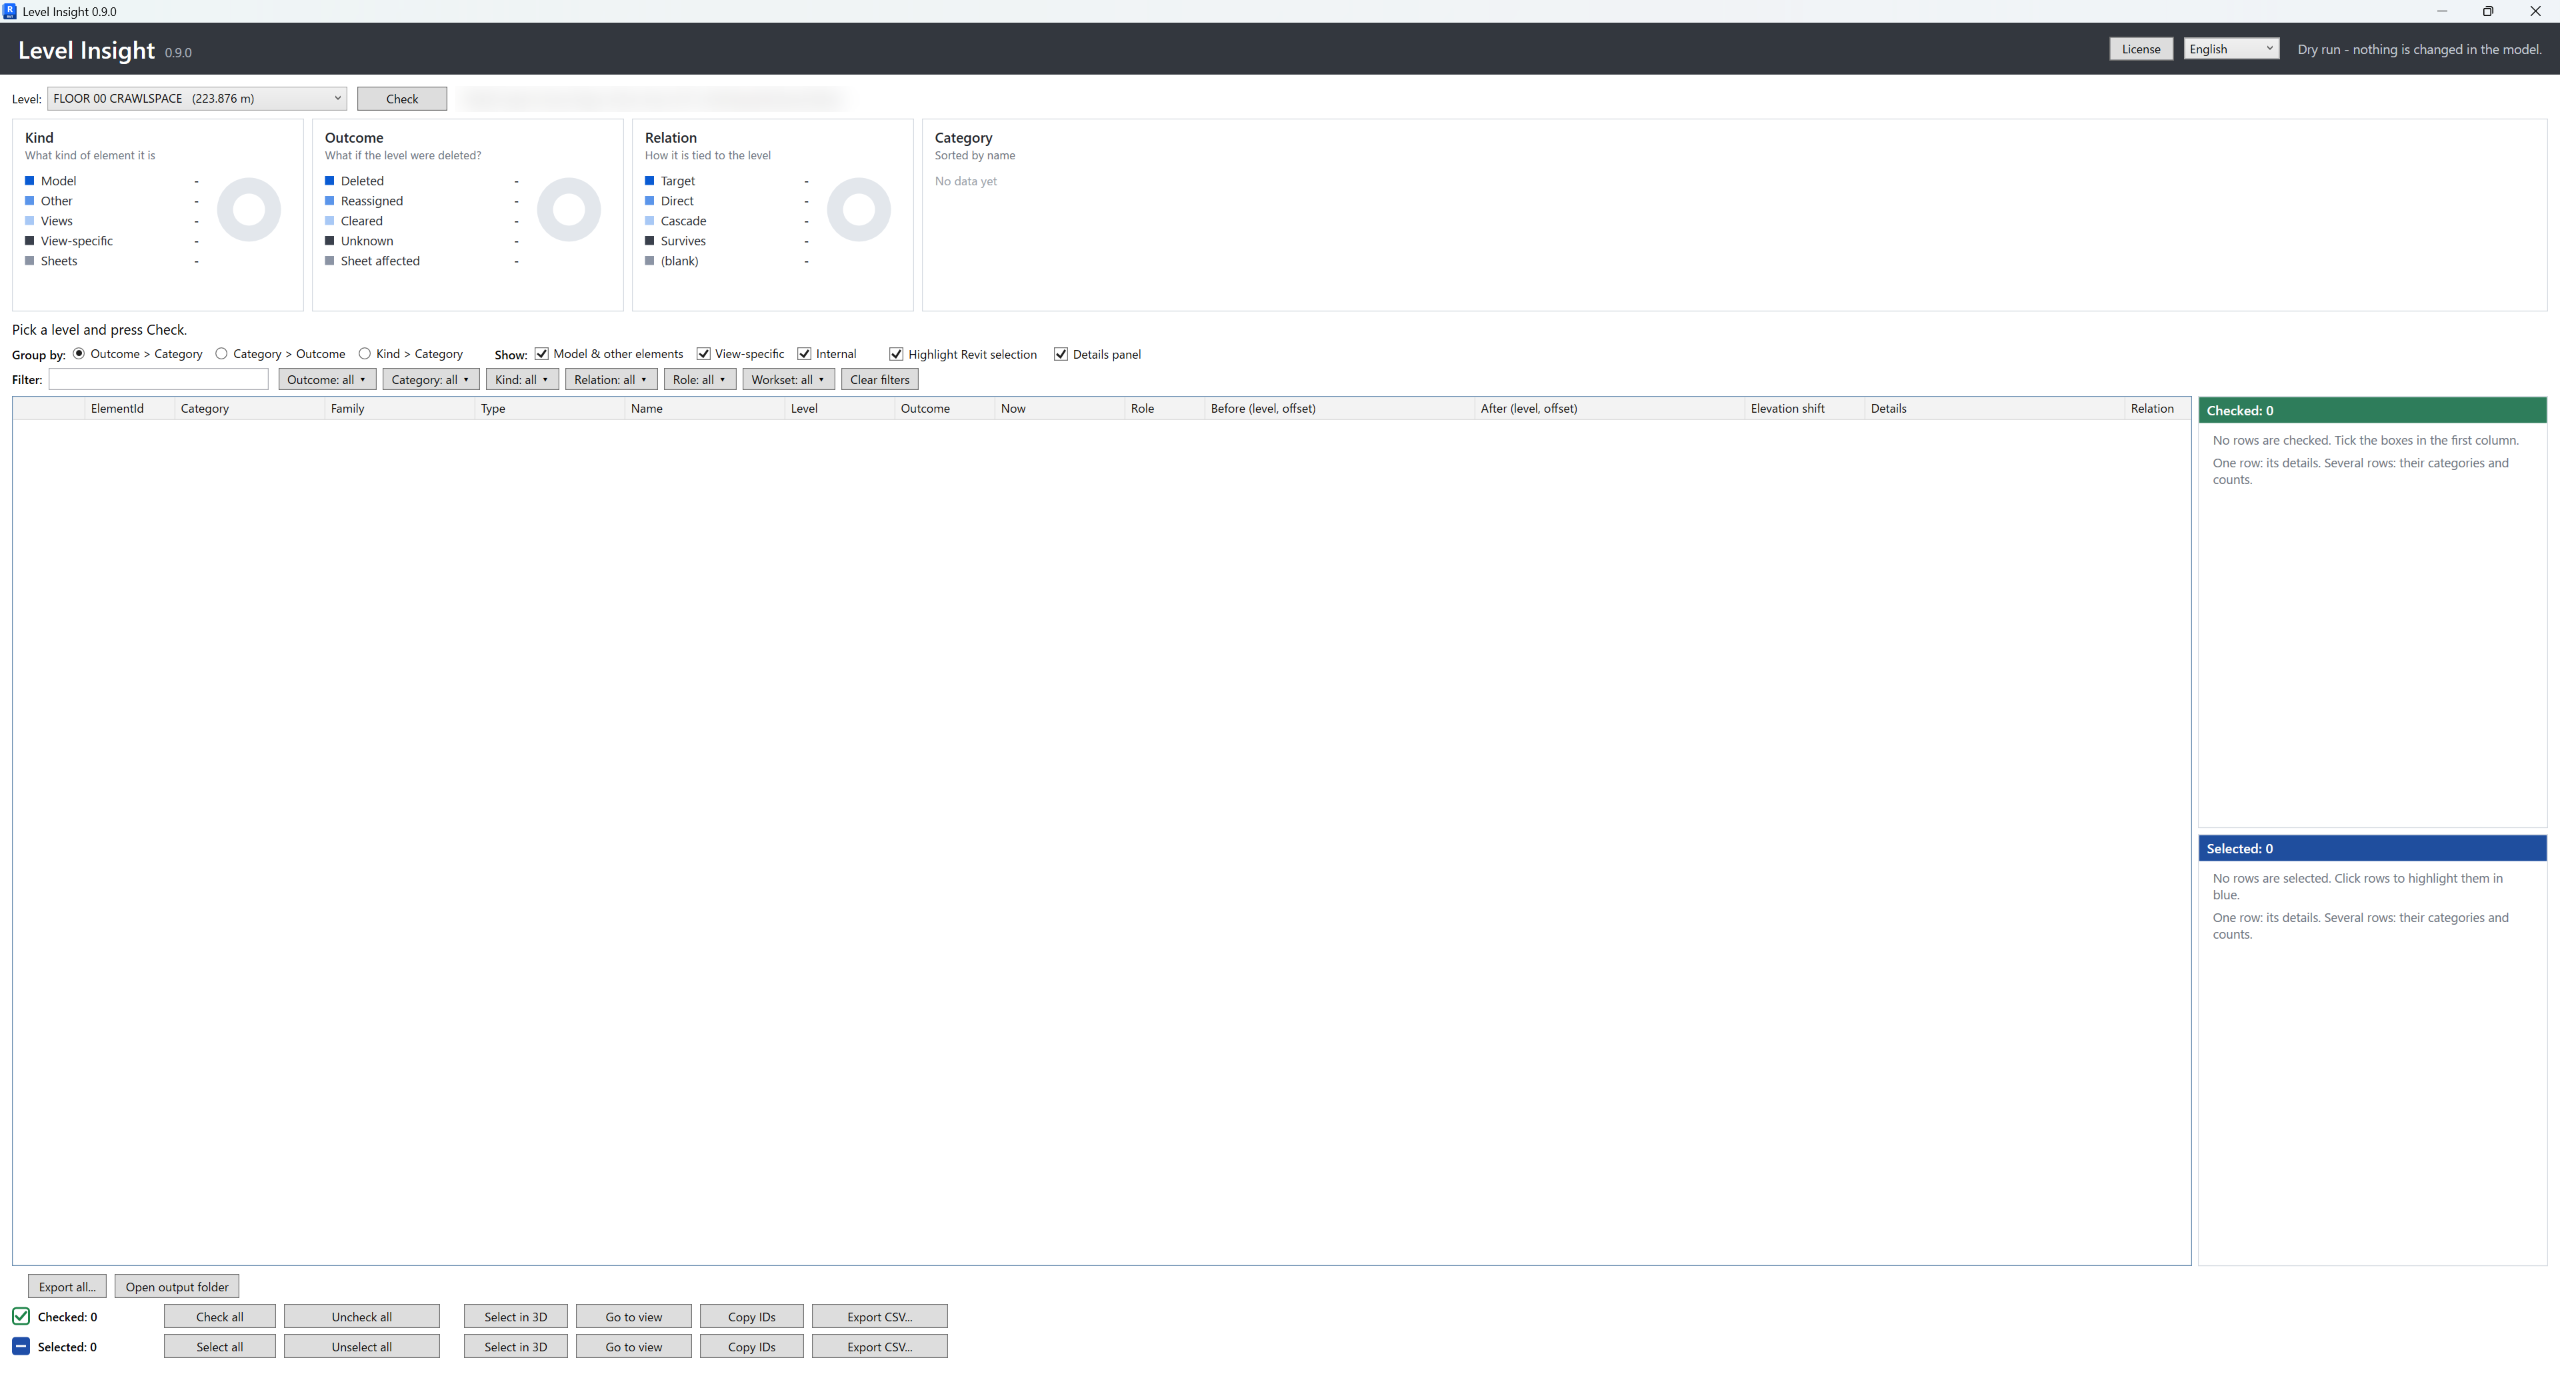
- Press Level Insight in the Add-Ins tab. A window opens next to Revit. You can keep it open while you work.
- Pick the level in the Level list and press Check.
- Wait while the progress panel runs. It shows four steps:
- Step 1 finds elements tied to the level, by reading 19 level parameters.
- Step 2 asks Revit what a delete would remove. This is the longest step on big models.
- Step 3 undoes the dry run. Your model is not changed.
- Step 4 builds the list.
- The list appears. Pick another level and press Check again as often as you like.
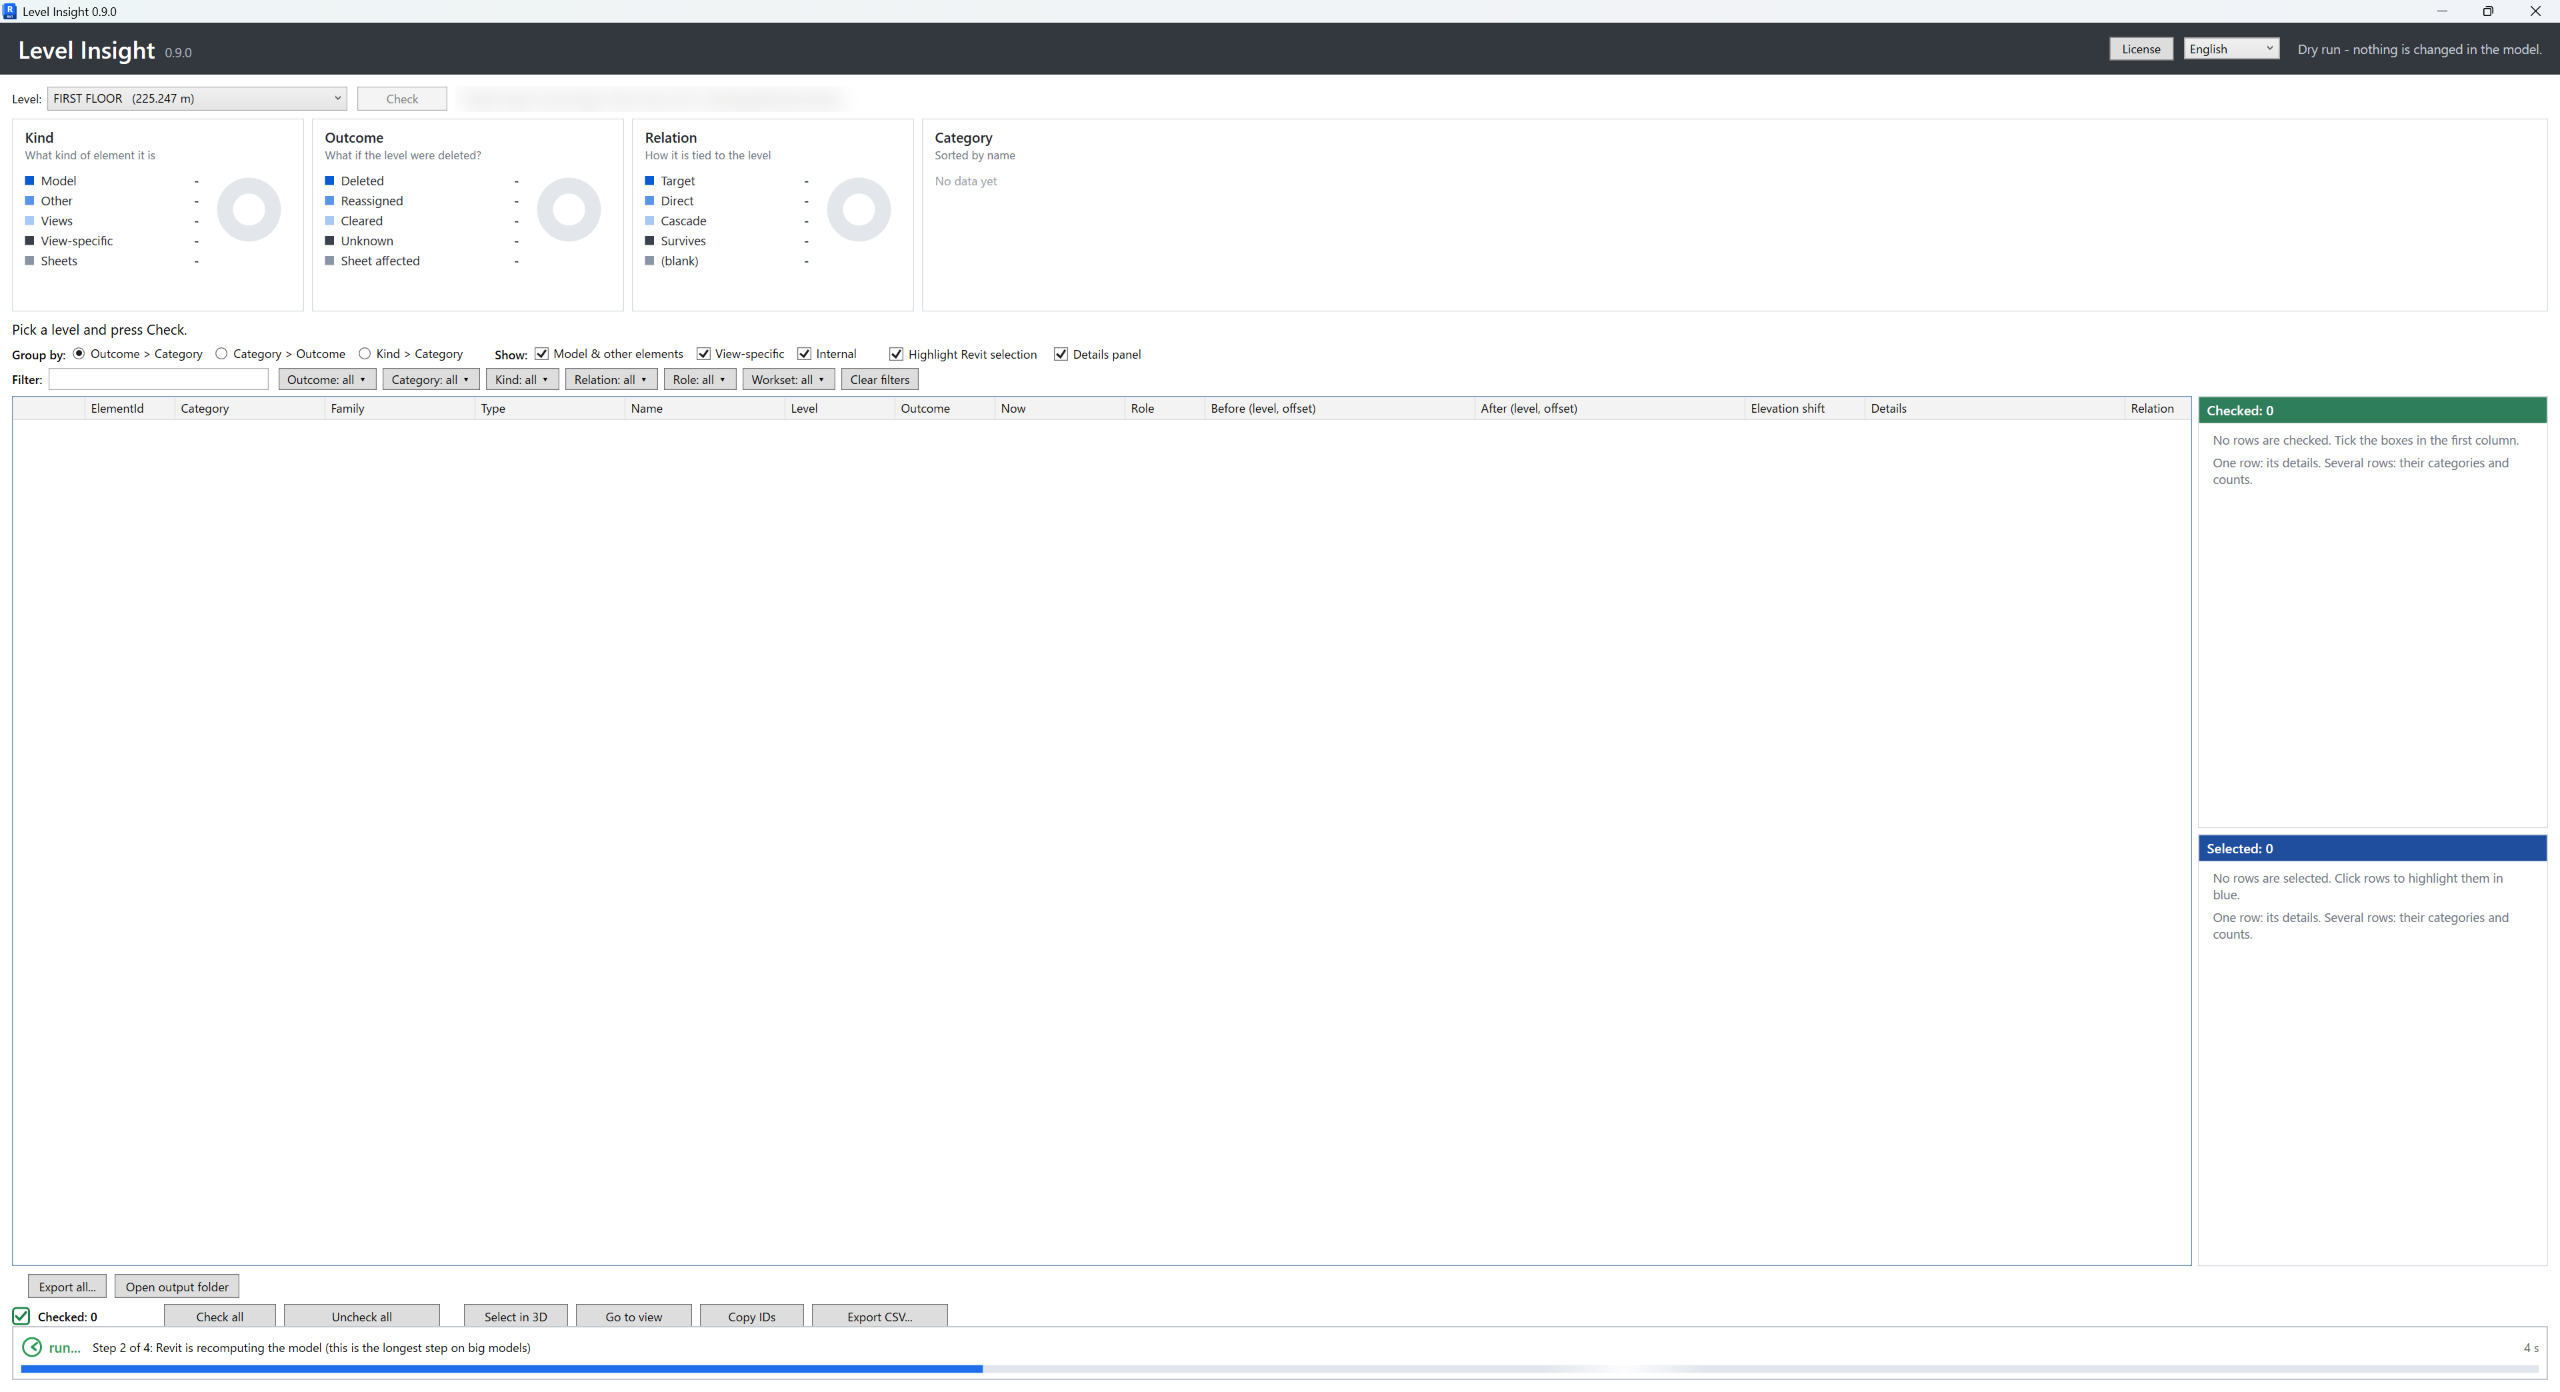
While a check runs, Revit is busy and does not respond to clicks. The progress panel keeps moving so you can see it is working. Save your work before a check on a very large model, as you would before any heavy operation.
The window says Dry run - nothing is changed in the model. because that is how it works: Revit deletes the level inside a transaction group, the add-in reads what happened, and everything is rolled back. Because Revit itself does the deleting, the result matches what would really happen.
Revit cannot delete a level while that level's own plan view is the active view. If that is the case, the check switches to another view for the dry run, goes back to your view afterwards, and says so in the status line.
If the level is pinned, Revit would normally ask you to confirm the delete. The check ignores the pin for the dry run, notes this in the status line, and leaves the pin as it was.
Read the result
The line at the top shows the totals for the level you checked. Each element is one row, however many level references it has. Below that are the grouped rows.
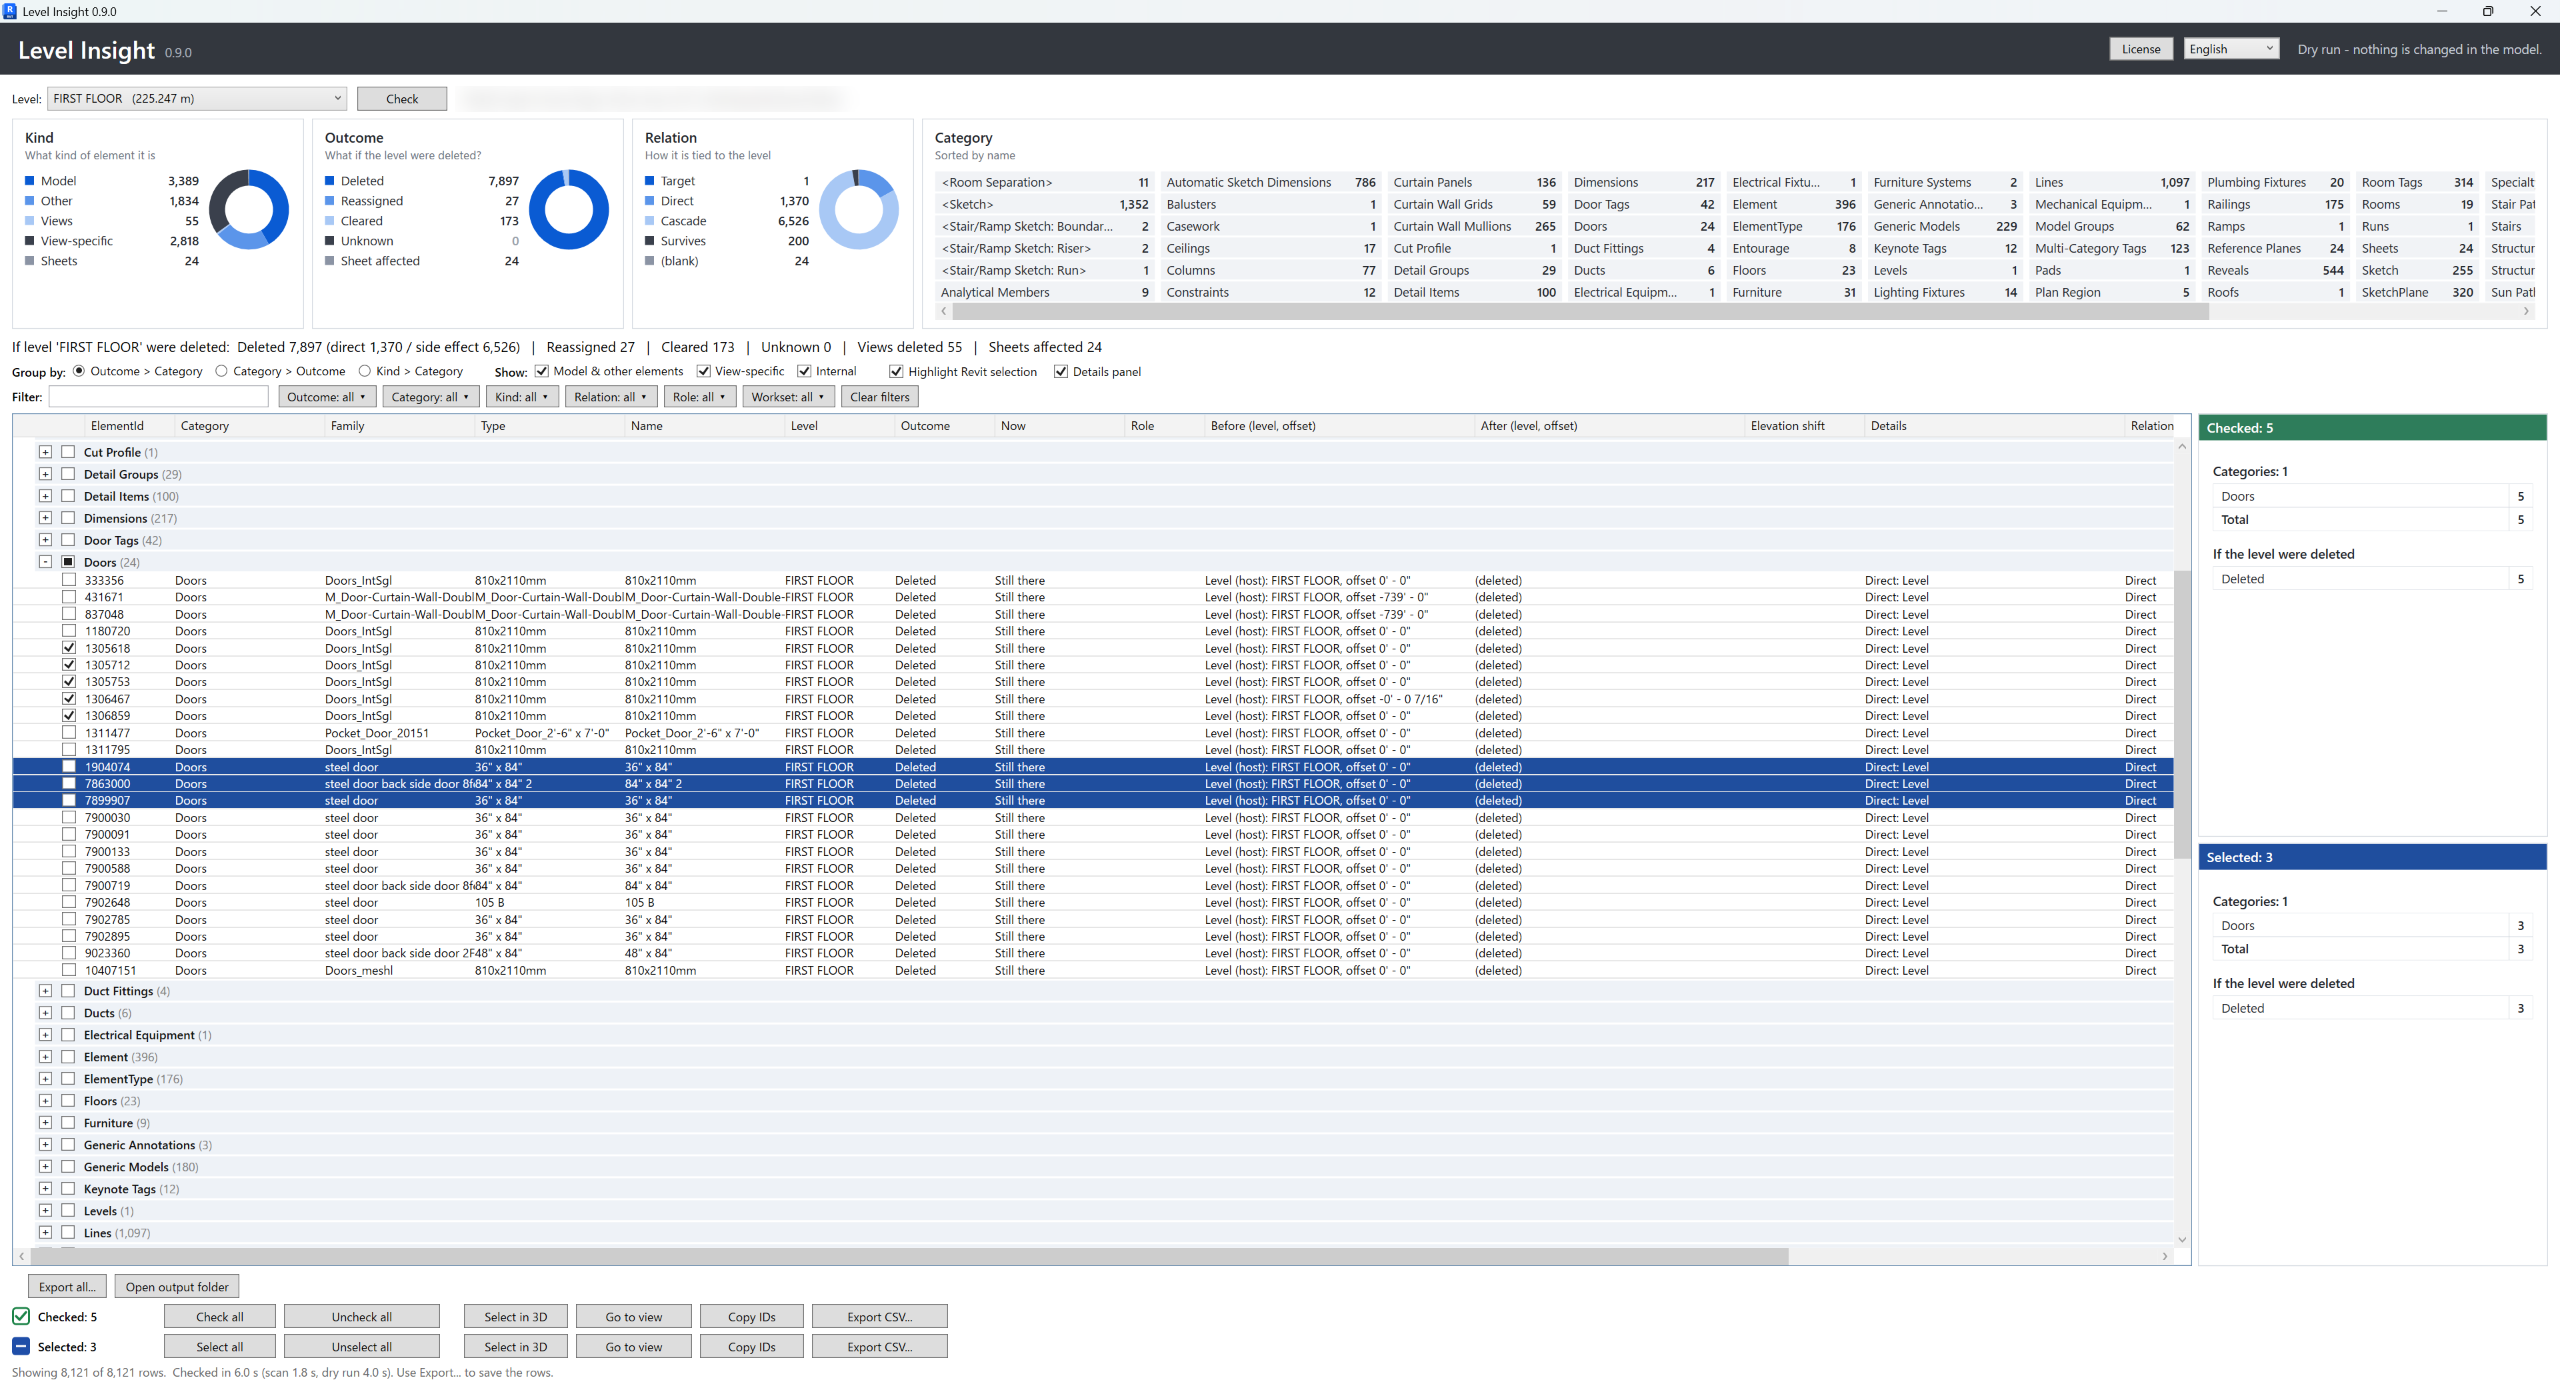
Hold the mouse over a box title or an item in a box to see what it means.
Outcomes
| Outcome | What it means |
|---|---|
| Deleted | Removed together with the level. Direct rows point at the level themselves. Cascade rows go away because something else was deleted, like a door in a deleted wall. The level itself is marked Target. |
| Reassigned | Kept, but its level reference moves to another level. The row shows level and offset before and after, and the elevation shift. |
| Cleared | Kept, but its level reference becomes empty, such as a wall top that becomes Unconnected. |
| Unknown | Revit reported a result the add-in could not interpret. Look at the row's details and check it by hand. |
| Sheet affected | A sheet loses one or more viewports because their views are deleted. |
If one element has several level references with different outcomes, for example a column whose base is kept and whose top is cleared, the row shows the most serious outcome (Deleted, then Cleared, Unknown, Reassigned). Every reference is listed in the Details column.
Group by
- Outcome > Category answers "what happens to what".
- Category > Outcome answers "what happens to my walls, my doors".
- Kind > Category separates model elements, views, sheets and view-specific items first.
Kinds of element and the Show boxes
Three boxes decide what the list displays. All three are on by default. The totals and the exports always include every row.
- Model & other elements: walls, floors, columns, family instances and similar things in the model, plus the level itself.
- View-specific: items that live in one view only, such as detail lines, text notes, dimensions, tags and filled regions.
- Internal: elements Revit creates and manages itself. They are rarely something you act on, but they explain some counts.
Views and sheets that are affected are shown with the kind Views and Sheets.
Columns
ElementId, Category, Family, Type, Name, Level, Outcome, Role, Details (before and after), Relation (Direct, Cascade, Target or Survives), Owner view, Sheet and Workset. Role tells you how the element is tied to the level: Host, Base, Top or Reference.
Search and filter
- Search box: type part of an ElementId, category, family, type, name, level, details, view, sheet or workset. Several words must all match, in any order.
- Filter buttons for Outcome, Category, Kind, Relation, Role and Workset. Open one and tick the values you want. Filters combine.
- Clear filters brings back the full list.
Choosing View-specific in the Kind filter switches the View-specific box on for you, so those rows are visible.
Work with the rows
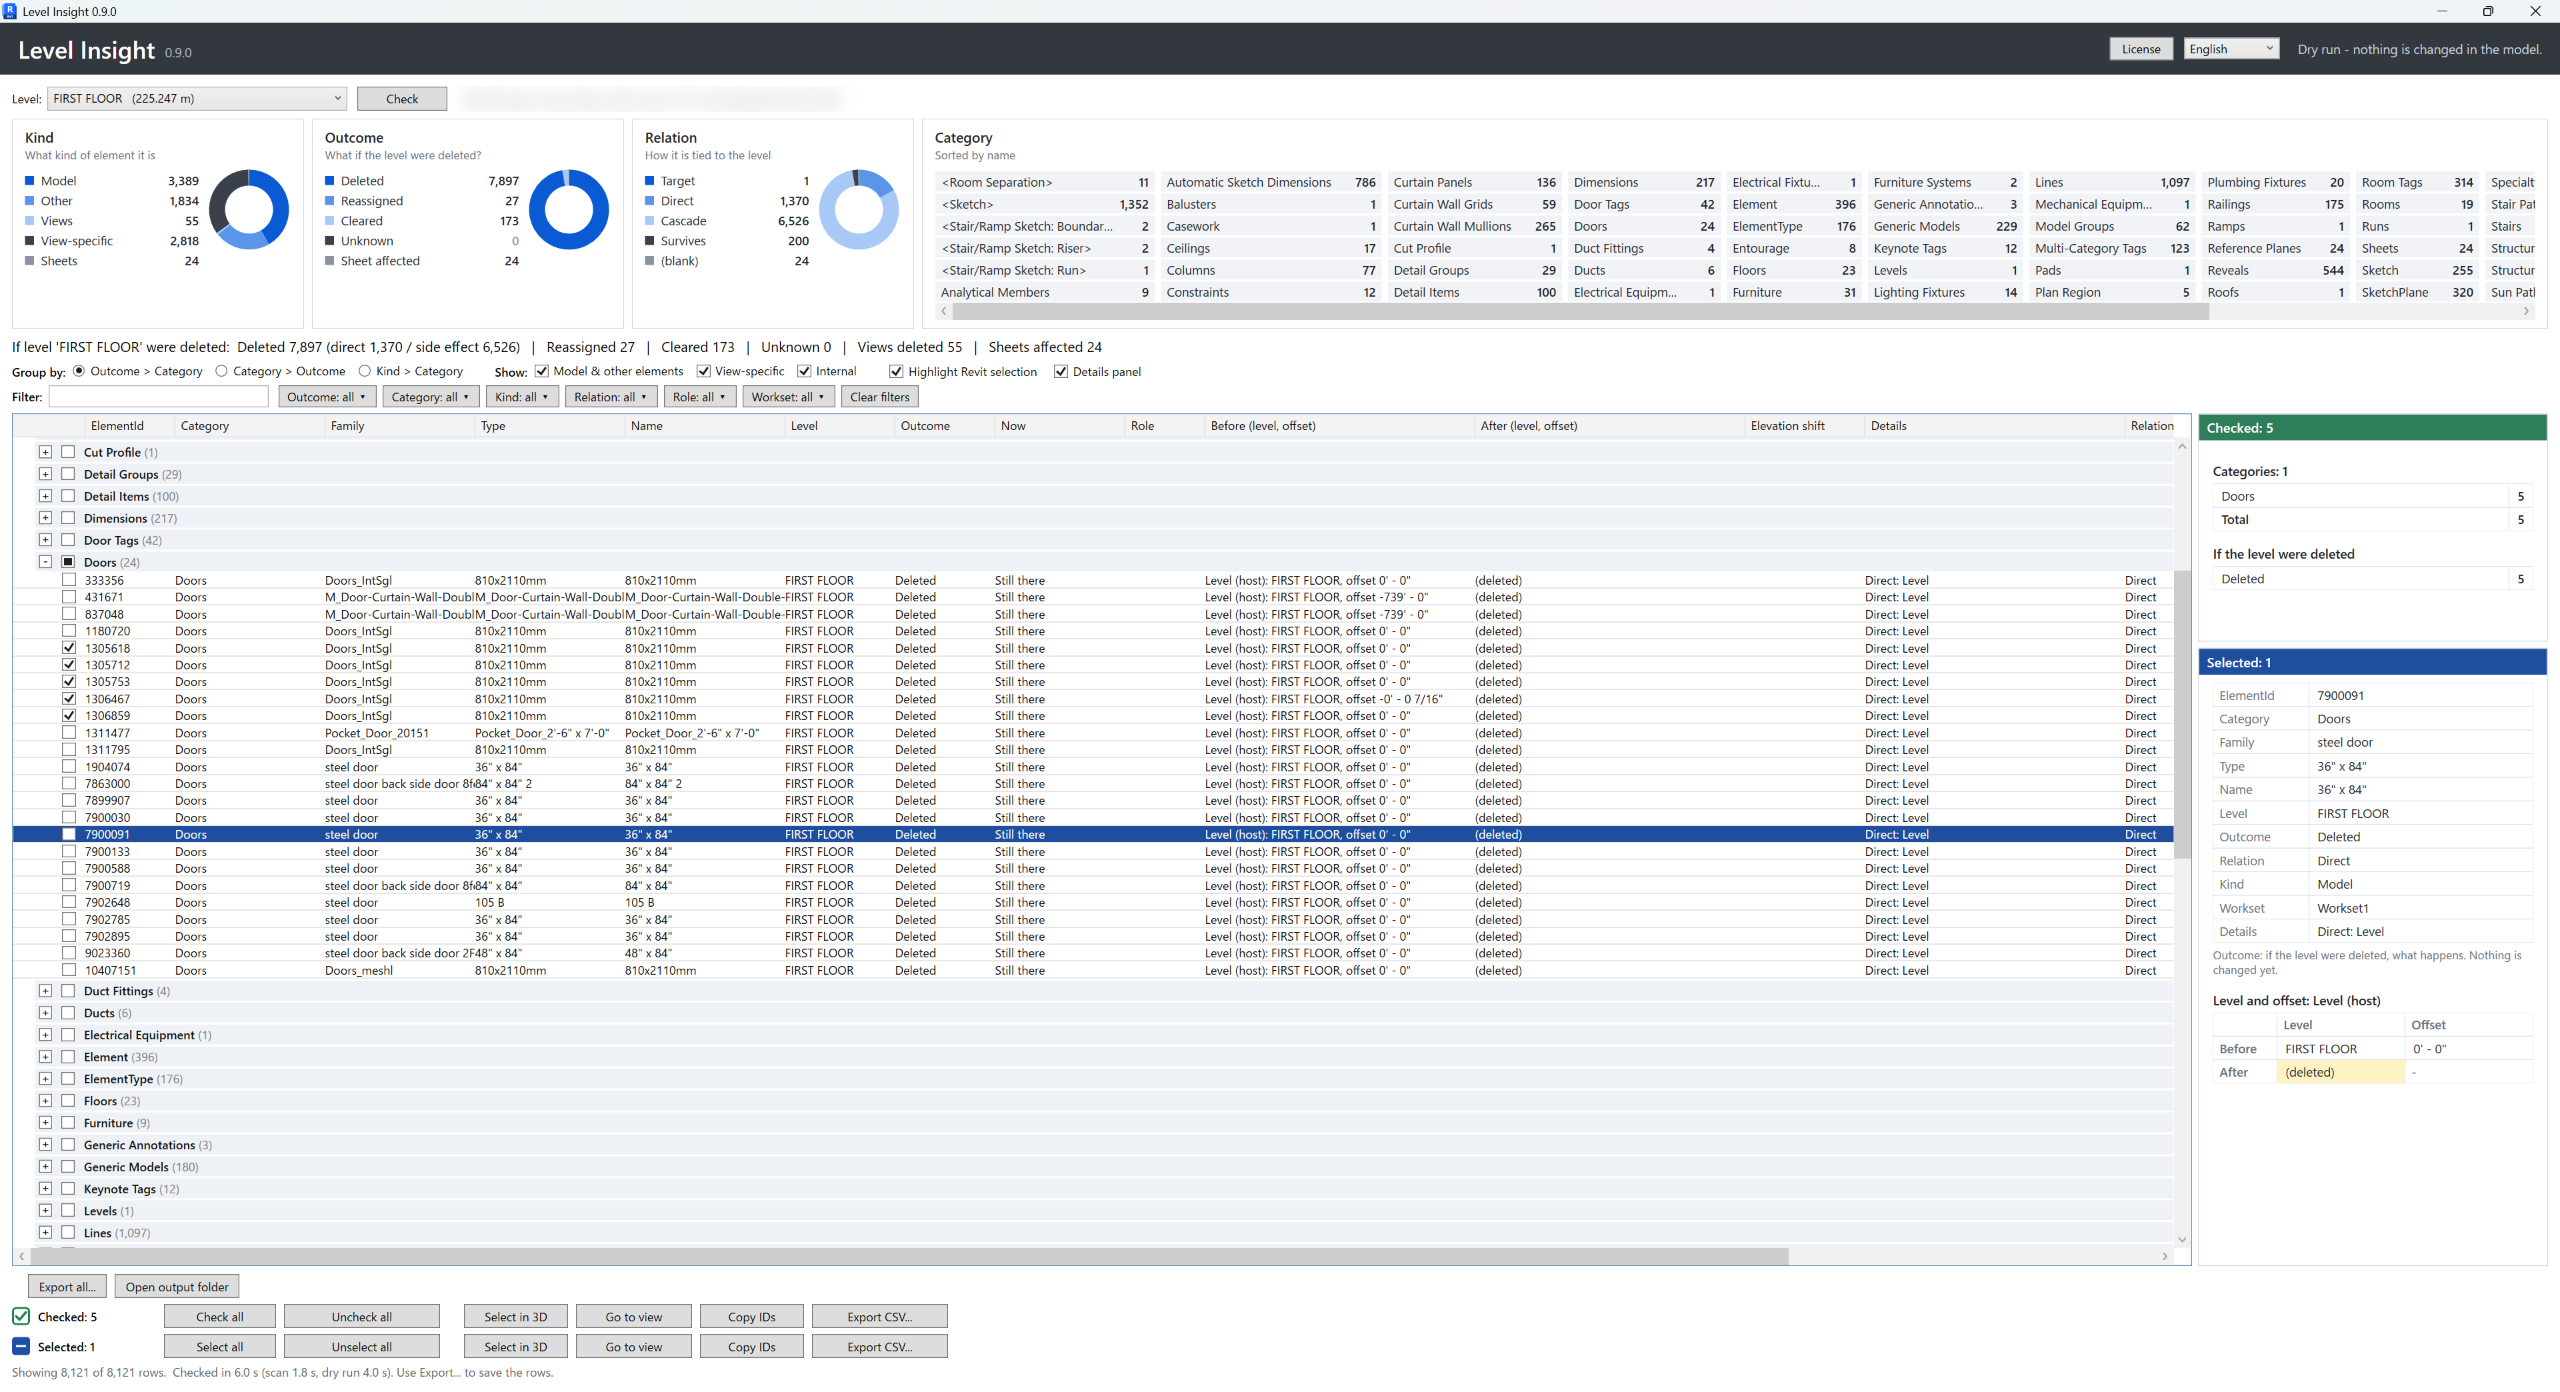
Tick the check box of any row or group. The buttons below the list act on the ticked rows. If nothing is ticked, they act on the rows you highlighted.
| Button | What it does |
|---|---|
| Select in 3D | Selects the rows' elements in Revit and zooms to them in a 3D view. If the current view is not 3D, it switches to the model's default 3D view. Elements hidden in that view by categories, filters or a section box will not be visible. View-specific rows are skipped. |
| Go to view | Opens the view or sheet that owns the highlighted row and selects the element there. This is how you reach view-specific items. |
| Copy IDs | Copies the ElementIds to the clipboard, ready for Revit's Select by ID. |
| Check all | Ticks every row currently shown. Useful after filtering. |
| Uncheck all | Clears all ticks. |
| Open output folder | Opens the folder with the log file, which helps if you need support. |
The upper row of buttons works on the Checked rows (green check mark) and the lower row on the Selected rows (blue, the rows you highlighted). The panels on the right show the details of each group.
Highlight Revit selection works in the other direction. Select elements in Revit and the matching rows light up in the list.
These actions change only the selection and the active view, never the model.
Export
Press Export... and choose a file type.
- Excel workbook (.xlsx) with several sheets: Summary (totals and a category by outcome table), All elements, Deleted, Changes (reassigned, cleared and unknown) and Sheets & views.
- CSV (.csv) with all elements, for your own tools.
Exports always contain every element, whatever the Show boxes and filters say. Filter in Excel instead.
Ways to use it
Before you delete a level
Check the level, read the Deleted count, and group by Category to see what goes. Look at Reassigned and Cleared to see what stays but changes. Decide if the delete is safe.
Check → Outcome > Category → Select in 3D for the walls and floors
Merging or cleaning up levels
You have two levels that should be one. Check the one you will remove. Reassigned shows where elements will land, and the elevation shift tells you whether anything moves up or down. Cleared rows are elements that will lose their constraint and need attention.
Finding what is tied to a level
The list is not only about deletion. It shows everything that references the level through its level parameters. Use it to find elements on the wrong level, or to see what would be affected if you change a level's elevation.
Which views and sheets are involved
Filter Kind to Views to see which views belong to the level, and look at Sheets affected to see which sheets would lose viewports. Go to view takes you to the view to check it.
View-specific leftovers
Detail lines, notes and tags in a deleted view go with it. Filter Kind to View-specific, then use Go to view to see them before they disappear.
Model handover and audit
Run the check for each level and export to Excel. You get a record of what depends on each level, with ElementIds, to attach to a handover or review.
Working with a team
Send the Excel file to the person who owns a discipline. They filter by category or workset and use the ElementIds to select the elements in their own copy of the model. The Workset filter helps when several people edit the model.
Large models
Level Insight has been tested on a model with almost 700,000 elements. Typical times:
- About 9 seconds for a model with 46,000 elements.
- Between 1.5 and 3 minutes for models with 570,000 to 700,000 elements.
Times depend on the computer and on how many elements the level removes. When a level removes tens of thousands of elements, Revit takes longer to recompute and to roll back. Use the progress text to see which step is running. Step 2 is the long one.
Tips: close other heavy windows, work in a view that is not too heavy, and avoid editing while the check runs.
Limits
- The scan reads 19 built-in level parameters, plus everything Revit reports as deleted. Custom or shared parameters that point at a level are not read.
- Linked models are not analyzed.
- For CAD imports, Revit assigns the new level only later, so the row says that the level is chosen by Revit.
- This version only checks. It does not move elements to another level.
Troubleshooting
Revit shows "Unsigned Add-In" when it starts
This is expected: the add-in is not code-signed yet. Revit asks once whether to load it. Choose Always Load, and the dialog will not appear again. If you chose Do Not Load, the button will be missing; install again, or start Revit again and choose Always Load when asked.
The Level Insight button is not in Revit
Check that you installed the version for your Revit year, and that Revit was closed during the install. Look in the Add-Ins tab. If Revit asked about loading the add-in at startup, choose Always Load.
The window says the check failed
Your model was not changed. Press Open output folder and send the newest log file to support.
The check is slow
Large models need time, mostly in Step 2. See the Large models section above.
A row has no view-specific details I expected
Check that the View-specific box is ticked and that no filter hides it. Exports always include everything.
Did the check change my model?
No. The dry run is rolled back before the result window opens, and the add-in confirms that the level still exists.
Questions or problems: contact form